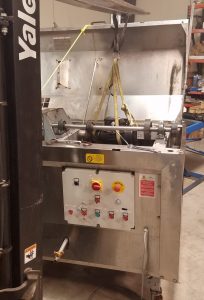
Our customer requested a control panel for the following equipment: 1. Bin Dumper 480v 2. Vibratory Feeder 240v 3. 120v Outlet 4. Elevator Conveyor to Shaker 5. Dual Level Shaker (shakes the leaves and rocks out of walnuts) 6. Scrap and Waste Elevator Conveyor 7. Finished Product Elevator
Our customer’s maintenance department has retrofitted the equipment for use at a large sorting facility in Stockton California Our obligation is to provide 30 amps of 480v power to run the machine as a portable set of machines that can be relocated anywhere in the plant
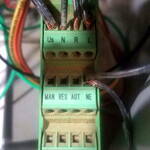
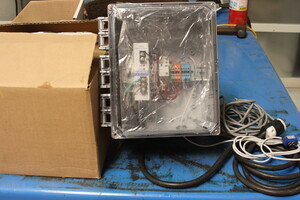
This is the electrical drawings for the final control panel 20x20x8 Nema12
One of the most clever devices we use in our controllers is the Phoenix Contact ® ELR W3 Reversing Contactor. For smaller 480v Motors (Under 5hp) the Phoenix Contact ELR W3 is a time saving device that works perfectly for managing conveyor motors. There are 2 versions – the 2 amp and the 9 amp – and each integrates will with any conveyor control system. They are pricey at about $240 each but if you build control panels with several motors, you will find that using these is a time saving method of connecting motors. Phoenix makes a set of accessories for them including plug in bus connectors. They can daisy chain to the Safety Circuit too.
It also works perfectly with our RF BIN DUMPER Controller
Use our Robot PM Checks or actions to perform a good maintenance on your robot • Backup Software (both image and separated files if possible) • Clean limit switches and check for free movement • Replace robot batteries 1/year • Replace RAM B/U batteries 1/year • Clear alarms and check cycle power after replacing batteries • Clean controller cooling fans, check operation • Check fans on drives are running in controller cabinet • Check fans exchanging outside air into controller • Replace controller air intake filter • Control connections • Robot cables for damage or wear • Robot cable connections • Incoming voltage • Mechanical hardware for looseness (end of arm tooling, robot base, fixtures, etc.) • Axis following error • Axis brake functionality • Axis vibration- hold your hand on the axis casting and jog robot slow/fast/Pos/Neg • Axis repeatability and backlash – use indicator program if in question • Check belts if used for some of the axis
End Effectors and harnesses on a robot can have problems which have to do with the cables and hoses becoming damaged over time. Rotation and linear movement causes cables and hoses to break or leak. Dust and dirt damage linear bearings and actuator seals. Often, problems become intermittent as the cycle of the robot can cause a problem in one position and not the other. The clever maintenance tech knows this has to do with the robot harness.
if you have not replaced a robot harness, you will be in for an experience as it is very hard and time consuming. When a robot is assembled. the order of assembly generally makes the harness easy to install. But after everything has be placed inside the robot, it becomes very hard to “simply replace” the harness. Often you have to remove internal components having nothing to do with the problem.
Replacing the bearing cartridge on a linear bearing gets harder and harder over time as most end effectors have aluminum frames. The threads and inserts wear out quickly and threads stretch from improper torque.
We suggest identifying the problem before it happens and here is a guide to some of the things we use at BTS to keep a robot harness from being damaged
We originally designed this so a forklift operator would not have to get off and operate a machine. In that application we configure the relay as an “Impulse Relay”. One press of the button and the relay contact #1 closes and relay contact #2 opens. Touch the button again and the relay operates the opposite way.
15 amp contacts on the relay can operate multiple relays or even a motor or a large light.
Unit operates at 120vac. Use for electric appliances, controlling illumination, heating, motors, ventilators, warning illuminating on the road, flashers, cyclers, frequently switched systems
The purpose of this system is to warn approaching vehicles of the status of other approaching vehicles when traveling into and out of an unseen area such as a basement parking area or parking behind a closed door. Vehicles approach over the loop detector at each Traffic Signal area and the status of the lights changes according to how the operator has the system setup..
Approaching Vehicles should view the status of the light before entering the traffic area: LIGHT STATUS SIGNALS: Blinking Green – both Areas are clear of traffic Solid Green – OK to move your vehicle forward Solid Red – Vehicle approaching from the opposite direction – CAUTION
The system is robust and operates at an intrinsically safe voltage. There is conduit from the controller location to both the inner and outer parking area with low voltage wire inside. There are 2 Signal Lights (Red/Green) mounted in a bright yellow box at each entrance of the parking areas.
This brochure is written to illustrate the installation of a Kawasaki R-Series Robot as a machine tending application for any standard OKUMA or HAAS CNC Lathe. There are other types of CNC lathes that will work for this application as well. This software and hardware is not limited to OKUMA and HAAS.
This manual is for machine tending and handling parts up to 50kg (100lbs) in weight. For larger weights, configurations or requirements including external manipulators and conveyance hardware, contact support@calrobot.com or call (855) ROBOT-99
Eaton’s Universal TR Series timers are a versatile and cost-competitive family of timing relays. The compact IEC-style housing installs easily onto a standard DIN rail, and the direct-wire design eliminates the need for additional sockets and accessories. Each timer has multiple user-selectable timing functions and timing ranges, and a universal input voltage of either 12 or 24 volts to 240 volts AC or DC, depending on the model.
Reducing your inventory costs With up to seven selectable timing functions and seven selectable time ranges from 50 milliseconds to 100 hours, you can meet the needs of almost any application with just one or two stock items. Do you need 24 Vdc control in some cases and 120 Vac control in others? You are covered with the Universal TR Series timer, as it has a universal, self-selecting control voltage input range from either 12 or 24 volts (depending on model) to 240 volts AC or DC. Are you tired of buying minimum quantities of sockets and accessories for your plug-in timing relays? The direct wire
design of the Universal TR Series gives you everything you need in a single item.
During initial installation, the large terminals on the Universal TR Series make wiring quick and easy. The offset design even allows easy access to the bottom terminals when the top wires are installed. The easy-to- read set point markings improve
the accuracy of setup, thereby reducing your startup time. Are you spending too much time troubleshooting and replacing
timers? The dual LED indicators on the Universal TR Series use multiple modes to signal input power, relay state and timing
status. The Universal TR Series also features a high-quality design with twice the relay life of many competitors.
Interval Controller can manage the input of any type of sensor – photo eye, proximity switch, limit switch, transducer and others. It can also receive an external input and operate an output based on the external input.
Gap Sensor Package
Configurable output can be programmed to be ON or OFF delay, one-shot, maintained or interval. You can use proximity switch, limit switch, photo-eye or any input relay contact.